One of the most frustrating issues you can have with your computer is a hard drive failure.
When your hard drive fails, you can lose all of your data. This means the loss of family photographs, work documents, music, and more.
It is enough to make you want to pull your hair out. Or curl into a ball and cry. It is a devastating experience.
Let me start with what your hard drive is and how it operates.
Your hard drive is the storage unit of your computer. All of your information is storage on this device. Your pictures, your music, your documents.
If you are having trouble picturing what your hard drive does, imagine your food pantry. You have a space where all of your food is stored. Your hard drive is the computer’s pantry.
Most hard drives contain platters that stores the data magnetically. These are called mechanical drives and will be what this article focuses on.
The data in a mechanical hard drive is read when the platter spins and an arm (called the stylus) passes over the magnetically stored data.
The hard drive, in a sense, works in a similar fashion as a record player.
Due to the platter rotating, a mechanical arm, and the magnetic discs hard drives can fail. The arm may touch the disc or the circuit board could fail. If this happens, your data could be lost forever.
You can help prevent the data loss by doing routine backups. It is a simple process to do and it gives you peace of mind.
To do a backup, you will need three things:
- Your computer
- An external hard drive
- Backup software
The first item you already have. The external hard drive and backup software you might not. I use a Western Digital hard drive for my backups. You can pick an external hard drive up at Amazon for less than $100. Make sure you have one that will hold all of your documents, music, photos, and movies.
The other item you will need is backup software. If you are running Windows 7, you can use the built in software to create a backup schedule. If you do not have Windows 7, you can pick up backup software from Amazon.
As I have Windows 7, I will guide you through the backup software that is included.
To begin, you must connect your external hard drive to your computer.
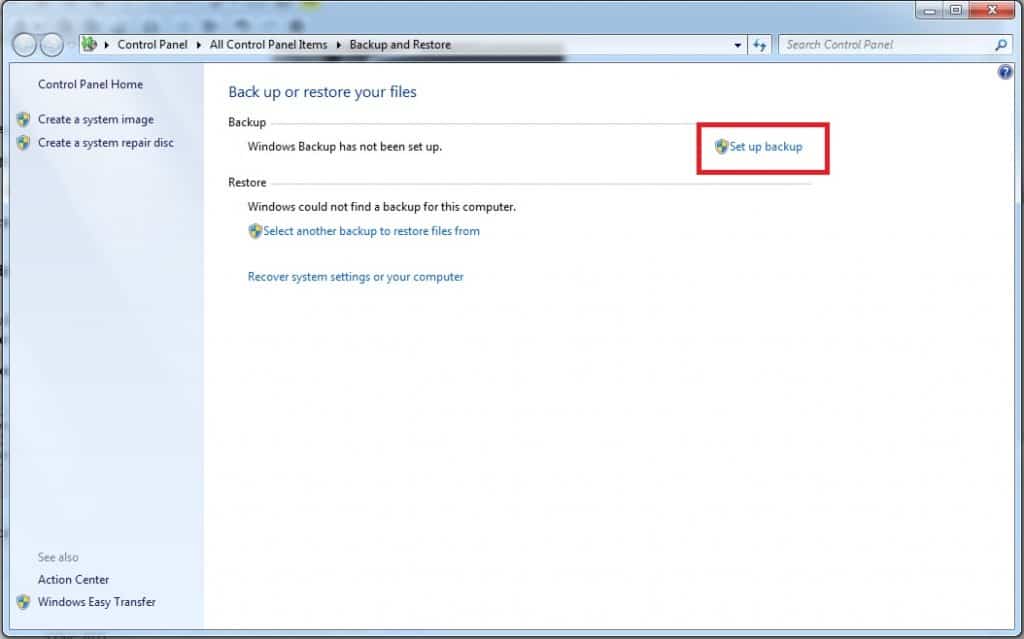
You will now need to setup the Backup Software. You will do this by clicking on the Start Button. In the search box, type Backup.
The Backup and Restore program should be at the top of the Start Menu. Left click on Backup and Restore.
The Backup and Restore program will now open. The window will give you an option for Backup or Restore. We will be doing Backup so you will click on Set Up Backup
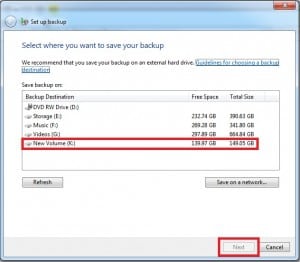
A new window will open asking you to select the drive you want to store the backup. This will be your external hard drive. Select the proper hard drive and click Next.
In the image below, my external hard drive is listed as the K drive. Your drive may be listed as another letter.
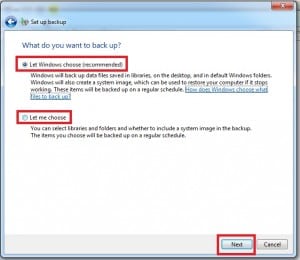
You have now selected the hard drive that will contain the backup data. Backup and Restore will now ask you what data you would like it to backup. You have two options. You can choose to have Windows choose or you can choose the file locations manually.
If you choose Let Windows Choose, it will backup the most common folders. These include files in libraries, on your desktop, and default file locations. This option will be fine for most users. If you have stored files outside of the libraries, desktop, or default locations you will want to choose the file locations manually.
Once you have chosen the backup method, click Next.
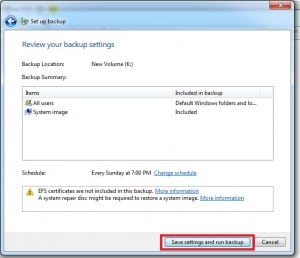
Backup and Restore will now let you review your backup settings. It gives you a summary of what will be backed-up. It also gives you a chance to change the schedule.
If the schedule will not work for you, you can click Change Schedule to change the time and/or day of the week.
You can schedule your backup to run daily, weekly, monthly, or almost any other time frame you can think of.
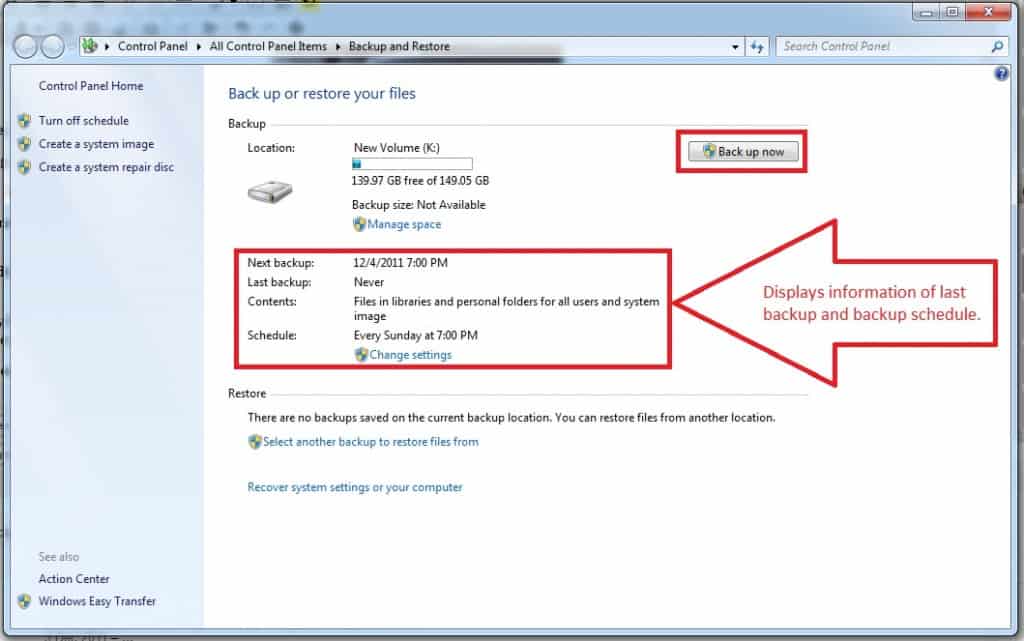
Your backup is now scheduled and ready to run. If you would like to perform a backup now, click the button that say Backup Now. If you are willing to wait, your backup will run at the scheduled time.
The final screen shows information regarding last backup and when the backups are scheduled.
You have now set up your backup schedule for Windows 7. Your backup will now be on the external hard drive and will be updated according to the schedule you chose.
Be sure you have your external hard drive connected to your computer when the backup is scheduled. If it is not, the backup will not be created.
Now if your hard drive fails you will only be a couple of hours or days behind. Is that not a great feeling?
Congratulations!
Question: Have you ever had your hard drive crash? How were you affected? Please share your answers in the comment section below.
If you found this post helpful, please share it with someone you feel would benefit from the information.





Please note: I reserve the right to delete comments that are offensive or off-topic.